zaterdag 31 oktober 2015

It's all about exquisite.....


Hello crafty people,

Today I have a lovely combination to show you made with the Exquisite edges and one of  the Fabulous Flapper ladies. I think they are a good match......
I had this background with the deco flowers for quiet a while . The flowers come from the Nouveau lovebirds. There are so many sheets in the CB collection that will combine perfectly with these edges, all elegant and stylish!

And now onto my card.......

Hallo creatieve mensen,

Vandaag heb ik een mooie combinatie om jullie te laten zien met de  Exquisite edges en een van de Fabulous Flapper ladies. Ik denk dat ze goed bij elkaar passen......
Deze achtergrond met bloemen lag al weer een tijdje te wachten op een vervolg en nu heb ik het dan eens afgemaakt. De bloemen zijn van de Nouveau lovebirds.
Er zijn zoveel stempel sets in de CB collectie die perfect combineren bij deze randen, allemaal elegant en stijlvol!

En nu naar de kaart.......
The background was made using Distress inks onto watercolor paper. Some shading with color pencils and adding some white highlights. I have embossed the upper edge using Wow embossing powder Ruby Romance and the lower edge was done using one of the new colors, Atlantic seaspray, a turquoise with gold sparkles.

De achtergrond is gemaakt met Distress inkten op aquarel papier. Wat accenten en schaduw met kleurpotloden en wit voor de highlights. Ik heb de bovenste rand geembosst met Wow Ruby Romance en de onderste met een van de nieuwere kleuren, Atlantic Seaspray, een turquoise met goud glitter.


Than I stamped the lady....I used a few Memento colors to ink her up and dabbed the ink on the lower part of her dress to let it fade. Than I extended some lines with color pencils.

Hierna heb ik de dame gestempeld met diverse kleuren Memento inkt en heb het onderste gedeelte van haar jurk vervaagd met een babydoekje. Toen wat lijnen verlengd met kleurpotlood.

Hoop dat jullie het leuk vonden en inspiratie hebben opgedaan. Ik vond het leuk om deze te maken.
Bedankt voor je bezoek en ik vind het altijd leuk jullie reacties te lezen.

Hope to have inspired you, I had fun doing this one.......
Thanks for visiting and always like to read your comments,

Have a lovely weekend,

woensdag 28 oktober 2015

Colourchallenge 16 at Chocolate Baroque!


Hi there,

Today I will show you my take on the 16th colourchallenge at Chocolate Baroque. Another 4 lovely colors to play with, come on and join! we like to see your creations.

I have a Christmas creation for you using the lovely Christmas foliage, still a favorite with these beautiful open and solid ivy leaves and Poinsettia swirl.

These are the colors of the 16th challenge......

Hallo allemaal,

Vandaag laat ik jullie mijn idee zien van de 16e kleurenchallenge bij Chocolate Baroque. Weer 4 leuke kleuren om mee te spelen, doe je ook mee? We vinden het leuk om jouw creatie te zien en je kunt er een leuk winkel tegoed mee winnen bij Chocolate Baroque.

Ik heb een kerstcreatie voor jullie met de mooie Christmas foliage, nog steeds een favoriet met deze mooie open en dichte klimop blaadjes en een Poinsettia swirl.

Dit zijn de kleuren van de 16e challenge.......voor meer informatie over de challenge kun je hier meer lezen.


and this is my interpretation..........would love to see yours.......
although I am not always commenting I really appreciate your work and ideas!

en hier mijn interpretatie........zou het leuk vinden om de jouwe te zien.....
ondanks dat ik niet altijd reacties achterlaat, ik waardeer jullie werk en ideeën!

Hope to see you at the Challenge blog from Chocolate Baroque!
Thanks for visiting and till next time,

Hoop je te zien bij het challenge blog van Chocolate Baroque!
Bedankt voor je bezoek en tot de volgende keer,


zaterdag 24 oktober 2015

Gelli-arts Colourstock........my first blogpost


Hi there,

Today my 1st blogpost as a DT member of Gelli-arts Colourstock. I have those Gelli-plates quit for a while in my stash....but did not (take) have the time to use them frequently and they are so much fun to play with.......
I did write a step by step photo tutorial but sometimes during the process I forgot to take a photo......

Now, let's start and if you have a Gelli-plate....take out your paint and walk along.....

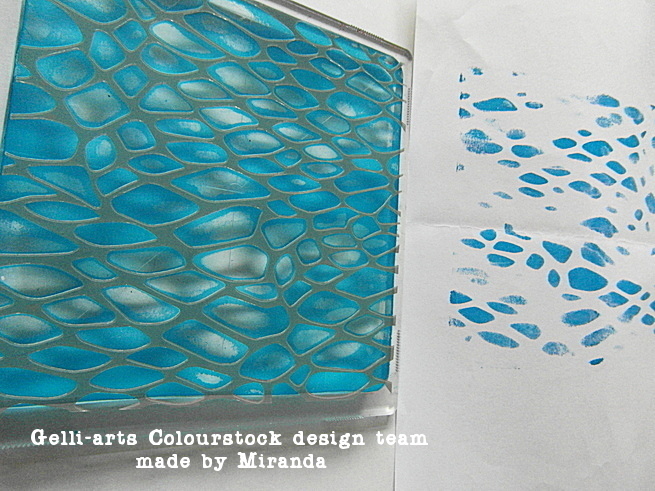
I did start with the 6"x6" Gelli-plate, some basic ARA acrylic paints, my mega mount acrylic plate( Clarity stamps) a brayer and some smooth cardstock which I already cut into the right size so it would fit exactly on my mega mount acrylic plate. And of course a lot of extra A4 copy paper and cleaning material.


Hallo allemaal,

Vandaag mijn eerste blogpost als DT lid van de Gelli-arts Colourstock team. Ik heb de gelli-plates al lang in huis maar nog niet echt tijd gehad(of genomen) om er veel mee te spelen en ze zijn zo leuk.......
Ik heb een uitgebreide stap voor stap foto tutorial gemaakt en hoop dat het zo duidelijk is, zeker voor degenen die dit nog niet eerder hebben gedaan.
Dus, laten we beginnen en als je al een Gelli-plate hebt, pak je spullen erbij en doe mee......

Ik ben begonnen met de 6"x6" Gelli-plate, wat basis kleuren van ARA acrylverf, mijn megamount basis plaat (handig om de GP op te bevestigen) een brayer en wat glad papier die ik op de maat van de onderplaat heb gesneden. En natuurlijk veel A4 kladpapier en schoonmaakdoekjes.

so let's get rolling.........

apply some dots of paint.......I am using Phtalo blue
My experience is that most of the time I will need to take of excess paints......

first layer of paint
eerste verf laag
After applying my first layer of paint with a brayer I roll of the excess paint on an A4 copy paper and gave a next roll over the GP with a clean brayer. This creates a more translucent layer of paint 

Nadat ik mijn eerste verflaag had aangebracht met de brayer heb ik de brayer een paar keer over een klad A4 gehaald zodat er geen verf meer afkwam. Als je hierna weer over de GP gaat wordt je verflaag een stuk dunner en transparanter.


I have used the snake stencil here(Andy Skinner)
Ik heb het slangen stencil van Andy Skinner gebruikt


Take some A4 paper and press here and there over the stencil to blot and remove some of the paint.
You can see how I did this......here

Neem wat A4 papier en druk hier en daar op de GP om wat verf te verwijderen 
Hier kun je zien hoe....


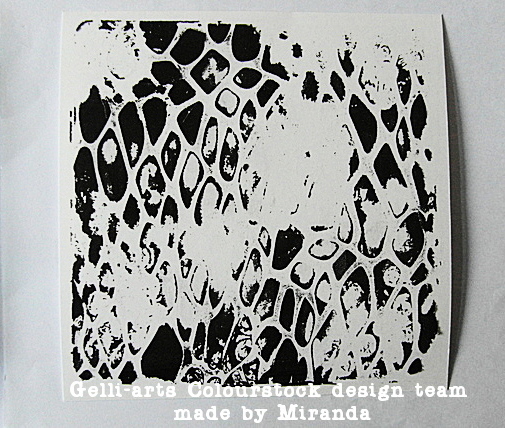
Remove your stencil and allow the paint to dry for a few minutes(depending on the type of acrylic paint)
If you do this right away, colors will blend.....
Verwijder het stencil en laat even een paar minuten drogen(afhankelijk van de soort acrylverf)
Als je dit gelijk doet dan mengen de kleuren zich.....


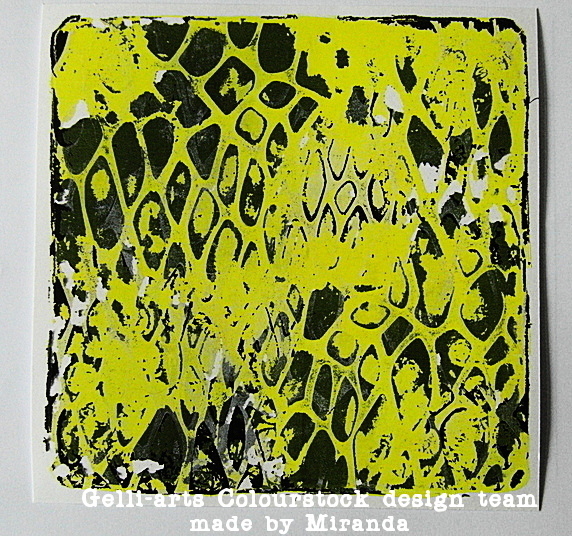
Apply some Magenta paint and roll with the brayer

Breng wat Magenta verf aan en verwerk weer met de brayer

And again take your stencil and replace it the same way as before......


And repeat the blotting.......with an A4 of copy paper
Remove the stencil and allow to dry
Herhaal het deppen met A4 papier hier en daar
Verwijder het stencil en laat weer even drogen

Finally apply some Titanium white paint
Tenslotte breng je wat witte verf aan


You can see that I was not patient enough because my white paint did mix a bit with the Magenta colour.......OK I can live with that......

Je kunt zien dat ik te ongeduldig was omdat mijn verf zich een beetje heeft vermengd met de Magenta kleur, OK daar kan ik mee leven......
Take your GP paper and place it on your GP........

Pak je GP papier en plaats het op de GP


Now......it's getting exciting....what will come out..........whoohoo....

Yeah, I like it......the snake stencil creates a great netting effect and depth!

Nu......wordt het spannend......wat komt er uit.....whoohoo
Ja, ik vind m leuk......het stencil creëert een gaaf net effect en diepte!


I have another one made with other colors but the same technique.........
Ik heb nog een andere gemaakt met andere kleuren maar dezelfde techniek.....


and a close-up......


Well, now have to create something with these backgrounds.........I will show you next time what I have made with them. A card or an AJ page maybe?

Hope you are inspired to take out your GP and paints or go to the store to buy a gelli-plate and have some fun with it!


Zo, nu nog de achtergronden verwerken......een kaart of een Art journal pagina misschien?
Hoop dat je geïnspireerd bent om je GP en verf tevoorschijn te halen of....naar de winkel te gaan en 
z' on leuke gelli-plate aan te schaffen! En er komen weer hele leuke nieuwe kleine vormen aan!


Als je meer wilt zien van de creaties en technieken met de gelli-plate , we hebben ook een Facebook pagina, Gelli-arts Colourstock waar je ook kans kunt maken op het winnen van z' on leuke gelli-plate!


vrijdag 23 oktober 2015

More Santa's from Verses.....


Hallo bloglezers,

Zoals ik jullie vorige keer beloofd had ben ik met de andere twee Santa's aan de slag gegaan. Het zijn twee heel verschillende kaarten geworden maar dat geeft juist zo leuk aan dat je met dezelfde stempel weer een totaal andere uitstraling kan krijgen als je andere kleuren en materialen gebruikt.
Voor een stap voor stap beschrijving kun je op het Colourstock blog kijken. Hier vind je ook nog veel meer tips voor het werken met Pan Pastel en Copic markers.

De gebruikte stempel van de kerstman en de tekst zijn van Verses en kun je hier vinden. De mooie grote Poinsettia achtergrondstempel is van Chocolate Baroque.

De achtergrond heeft nu de mooie parelmoer glans die moeilijk te vangen is op de foto.


Kerst tekst (Verses)
En dan naar nummer twee, de ' Vintage' Santa, weer geheel anders........
Hier heb ik gewerkt op kraft papier en met de metallic Pan Pastels.


Hier zie je de mooie glans van de metallic Pan Pastels op het kraft papier.

Hieronder nog even alle drie de Santa's naast elkaar.......
Had je de eerste Santa nog niet gezien.....deze staat hier met een stap voor stap foto tutorial


Ik hoop jullie geïnspireerd te hebben met deze vrolijke Kerstman en deze technieken.
Bedankt voor je bezoek en heb je toch nog vragen, stel ze gerust!


zaterdag 17 oktober 2015

Exquisite edges.......


Hello crafty people,

Today I have another sample to show you. I've been playing with fluid inks(like Ecoline), a Joggles stencil (Secret garden) and the beautiful Exquisite edges.

I wanted to keep it simple and I have just stamped the edges using Versafine Imperial purple and coloured afterwards with some color pencils. And as finishing touch a lot of white accents with an acrylic marker.
I have added the sentiment from the Artistic Expressions.

And here is the card......


Hallo creatieve mensen,

Vandaag heb ik een andere creatie om te laten zien. Ik heb gespeeld met vloeibare inkten(Ecoline, Shadow paints), een Joggles stencil(Secret garden) en de mooie  Exquisite edges.

Ik wilde het verder eenvoudig houden en heb de randen gestempeld met Versafine Imperial purple en daarna gekleurd met wat kleurpotloden. En als finishing touch veel witte accenten met een acryl marker.
De tekst erbij is van de Artistic Expressions.

En hier dan de kaart.......


So if you don't have the time to create an inky background you can also use some beautiful pattern paper and use the same stamping and coloring technique. Or one of Lesley's lovely download papers?
Hope to see your creations too with these beautiful stamps!

En heb je geen tijd of zin in een inkt achtergrond om te maken dan is mooi scrap papier ook super. Je kunt dan gewoon dezelfde stempel en kleur techniek gebruiken. Of misschien een van Lesley's gratis download papers?( Op het DT blog van Chocolate Baroque)
Hoop ook wat te zien van jullie creaties met deze mooie stempels!


maandag 12 oktober 2015

Another Autumn creation.....


Hi there,
Today as promised the 2nd Autumn card made on the WOW workshop in Amsterdam. Again a lot of Impression Obsession stamps.
And again I will join the Challenge ' Fall Florals' at the IO website.
Here is the list of materials:

Cover a card backgroundstamps:

Crochet-CC189
Grunge- CC076
Spatter-CC059

Silhouette 7-
Rose leaf- BB5557
sentiment- D4543

Wow embossingpowders:
Copper
Sunny yellow
Earthone Paprika/Olive
Clear semi matt

Hallo allemaal,

Vandaag zoals beloofd de 2e herfstkaart die we maakten op de WOW workshop in Amsterdam. Veel IO stempels en WOW poeders.
En weer doe ik mee met de Challenge ' Fall Florals' die je kunt vinden op de IO website.
Hierboven zie je het lijstje met materialen. Alles is te koop bij de Posthumuswinkel in Amsterdam!

I like creating lots of layers......and these cover a card backgrounds are so perfect for that!
Thanks for visiting and hope to see you again next time,

Ik vind het heerlijk om met zoveel lagen te werken......en deze cover a card achtergronden zijn hier perfect voor!
Bedankt voor je bezoek en belangstelling en graag tot een volgende keer,

zondag 11 oktober 2015

Autumn creations with Impression Obsession.....


Hello creative people,

Today I have a creation to show which I have made for a WOW workshop in Amsterdam. I was inspired by the lovely colors of Autumn which is one of my two favorite seasons. We did use several WOW embossing powders and a lot of Impression Obsession stamps. I also want to join the IO challenge ' Fall Florals' this time with these cards.
This is the list of IO stamps I have used on the 1st card:

Hallo creatieve mensen,
Vandaag een creatie die we maakten op de WOW workshop in Amsterdam. Ik was geïnspireerd door de mooie herfstkleuren, een van mijn twee favoriete seizoenen. We hebben diverse WOW poeders gebruikt en veel Impression Obsession stempels. Ik wil hiermee ook deelnemen aan de IO challenge ' Fall Florals'
Hieronder de lijst met IO stempels die gebruikt zijn bij deze kaart

Cover a cards:
Texture- CC213
Spatter-CC059
Metal-CC205

Rose leaf- E16069
Silhouette 7-B5557 
text stamp-C8494

And the WOW embossing powders:
Copper
Ebony black
Platinum
Clear semi matt


And soon I have another card from this workshop to show, so keep watching for more Autumn inspirations!
Thanks for visiting and always enjoy to read your comments!

Binnenkort nog een andere kaart die we op deze workshop maakten, dus stay tuned voor meer herfst creaties!
Bedankt voor je belangstelling en bezoek, 


' DANCE'

While I dance I cannot judge,
I cannot hate, I cannot separate myself from life.
I can only be joyful and whole.
That is why I dance.”
~Hans Bos